Friday, April 30, 2010

wii - day 7 continued - playing the game


So, after the last post about getting the wireless up and running it is time to talk about playing a game! So we have been using a website called Arcademic Skill Builders (www.arcademicskillbuilders.com) for a little while now to work on our Math facts. It is a great site based in flash where the students can play against each other in the classroom (or anywhere for that matter) in various Math skills (as well as Grammar skills). Well, the site also has a Wii page where you can play a handful of the games on the Wii. The first suggestion I will make is to save the page in the favorites. Then it is only 1 mouse click away. From here you can click on whatever game you want to play and get started. We chose the Meteor Multiplication game. Basically, you are the gun in the middle and there are meteors coming towards you. You have an answer on your gun and you have to choose which meteor coorespondes to the number on your gun. But be careful, some of the meteors have the same answer but are at different distances. If a meteor gets too close you blow up. Shoot the wrong one and you blow up. The round goes for a while (there is no specific number of correct problems - but there is a time limit which you can edit somewhat) and then you complete that round and move on to round 2. Each round they move a little closer and move a little faster. It was just a review, but a review that the students enjoyed more! Each student came up and played either one round or played until they got blown up. Plus, Chris decided to jazz it up a bit. We wanted to make sure that everybody was involved in the class, not just the people playing the game. So we had the students at their desk get out their Math notebooks and do something different each 6 people.
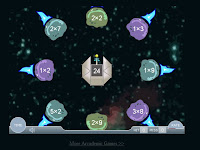
The first 6 people we did Fact Families for each problem. So if the answer on the gun was 12 then the students had to write down 1x12, 2x6, 3x4. We had 6 students come and go and kept track of the students answers on the notebook.
The second 6 people we did Multiples. So if their gun said 7 then the students had to write down 7, 14, 21, 28, and 35 (we capped it at 5 numbers so they could work on each one).
For the third 6 people we did Factors. So if their gun said 14 then the students wrote down 1, 14, 2, and 7. At this point we had a little review about Prime and Composite numbers vocabulary.
For the last 6 people we chose to do Prime Factorization! Do you remember prime factorization? It is the tree branches to take the numbers down to prime numbers. So, if they got the number 32 then they had to do this

We didn't get a chance to go through all the students so we will continue to finish up the next time we get a chance. More to come!

Just a couple of notes. Things I heard during the game- "This is so awesome". A lot of "don't die"! when the asteroids were coming towards the guns. A couple of students were saying how hard it was but they were trying to get it done.

Sunday, April 25, 2010

Wii, day 7 - setting up the wireless information

It has been a while since we used the Wii in the classroom. With our short week from Spring Break and then the Spring festival we had, there just hasn't been much time to get it all together. So, this week Chris and I worked at getting back into the swing of things. During Spring Break, I was able to get the wireless access points (Cisco 1000 series - older models which are end of life, but still work great) up and running throughout the school. So, what's the first thing that I need to do with them? Well, get the Wii up and running on the Internet of course! As with everything in technology, it should have been a cake walk. Just double click on the wireless adapter, auto find the SSID, put in the password (of course there is a password!) and cruise the web. And as with everything in technology, it just didn't work out that way! Here is a page with directions from Nintendo for setting up a wireless connection(BTW, the Nintendo site is a pretty good one with info on errors and pictures/videos to help with the install). I wasn't able to just double click and go for whatever reason. When I did a scan for the SSID, the console would see it and give me the correct security settings. However, when I tried to put in the correct password I would not be able to get on the web. It kept coming up with different error codes that had to do with wireless connection problems. So, after some conversations with a friend who is very knowledgeable with Cisco equipment (thanks Chuck!) we wound up creating another wireless SSID that didn't have the same level of security. I turned off the broadcast feature and created all the settings manually. If you click on the Manual Setup button (shown here) you can enter in all the settings.From here you add the SSID (again, I turned off the broadcast so I had to add it manually).
Then choose the type of security and put in the encryption password.
From here we manually put in the IP address and DNS address (if you don't know what these are you should be able to ask the tech person at your school).

The last setting is the easiest. Don't change it! Just leave it set at 0 and hit save.

At this point I was able to run the connection test and see it hit the Access Point. In just a few seconds I was talking on the Internet. The first thing the console wants to do is download the latest firmware from the web. You get the warning that if you have modified the console any that it may become unusable when the upgrade occurs (at least it gives you a warning/reminder). We did the upgrade at that point and it seemed to be steady connection and it worked the following day when we were playing a game. The next thing that we did was download the Internet browser for the Wii. Here is a page on specifically how to do this but I will give the highlights.
  1. Select the Wii Shop Channel from the Wii Menu. If you have not previously accessed the Wii Shop Channel, you will need to read and agree to the User Agreement.
  2. Once the welcome screen is displayed, select "Start Shopping."
  3. Select "Wii Channels" from the Wii Shop main menu, then select "Internet Channel." Select "Yes" if you agree to the amount and to confirm the download. THERE IS NO COST to download the browser.
  4. After the Opera Browser finishes downloading, the "Internet Channel" will be added to your Wii Menu.
Follow the directions on the link above to learn about the different icons on the browser and how to navigate around. It is pretty simple if you give the article a quick once over!

One thing, we did occasionally lose the connection for a second or two. I hope that this is just because the wireless lost signal (some kind of interference) for a moment. It did come right back but I did have to reset the game settings once it lost the wireless so it is a inconvenience, but certainly not a deal breaker. I think the reset was just because I was on a web page through the browser. If I had been playing a game I don't think there would have been the same reset problems...

Saturday, April 24, 2010

ubuntu update


So in the last two weeks I have been working on trying to get the Ubuntu computer up and running with the NComputing boxes attached to it. First things first, getting Ubuntu installed. This turned out to be more difficult then it probably should have been because of the equipment I am using. The first machine I was trying to install the OS on to was an older computer without a DVD player (it was a Dell Pentium III - like I said, an older computer). The latest version of the OS (Ubuntu version 9.10 as of this writing) can be downloaded as a bootable image, but it is over 3 GB in size so it has to go on a DVD disk. So that was problem #1. Of course, there is always the USB key option, but the BIOS on the machine was sufficiently old enough that booting to the USB drive isn't an option. So, the answer to that little quandary was to install the older version 9.04 (whose bootable image fit on a CD) and then update to 9.10 (the update is available via either the internet update within the software or you can download the update-which also fits on a CD disk).
Then on to problem #2, trying to put Edubuntu on the machine. In case someone isn't familiar (and up to about a month ago I didn't know what I was talking about either!), Edubuntu is a derivative of Ubuntu which has all of the educational programs already installed on it. While you can get them each as individual downloads, it is easier to get the whole version at once. They have it broken up into primary, secondary, and tertiary modules and including all kinds of different pieces of software, all free. Again, version 9.10 is too big to fit on a CD so I had to use version 9.04. Well, I guess that once I updated to version 9.1 Ubuntu, I couldn't put the 9.04 version of Edubuntu (I kept getting an error saying that it wouldn't install). So, I had to wipe the machine, install Ubuntu 9.04 from the CD and then install Edubuntu 9.04 and then upgrade to Edubuntu 9.10. Not too big of a deal, but time consuming. With the older equipment, an install takes about 40 minutes. And then another 30 minutes for the Edubuntu install. Ahhh, but that falls right into problem #3.
Once I had the 9.10 Edubuntu software installed, I completely lost my ability to open the My Computer option on the computer OR use the CD-ROM drive! For whatever reason, I could not use the graphical interface at all (nor could I get the CD-ROM drive to do anything else but eject from a DOS prompt). My assumption is that the older hardware was a problem. So, to review, at this point I have the latest version installed on the computer, but I can't do any of the graphical interface things that make it work like Windows. Needless to say, not a great showing. So, I am going to have to find some newer hardware and see what happens. And so that is where I will end for now. More to come!

Sunday, April 11, 2010

open source ongoing project in classroom


One of the issues that I have to work with is budget. Just like everyone else in the world, our budget is tight! I like the challenge and we are lucky that there are many different companies that give their products to schools at reduced prices or free of charge! Of course, there is also open source software which has been around and used in different organizations for years. I am looking at beginning to use the open source software operating system Ubuntu in our classroom. Ubuntu is a form of the Linux kernel and there are many different "flavors" of the software. The interesting part of Ubuntu is that there is an add-on called Edubuntu which has all kinds of educational software added into the OS. They are broken up into 3 packages- primary, secondary, and tertiary and add all kinds of functionality to the program for a classroom. It also includes a completely free version of an office productivity suite called OpenOffice. It has a word processing program, a spreadsheet program, a presentation software program, a database program and a graphics program. I am going to be working on installing the software on to some recently donated machines and try to get them up and running into one of our classrooms where the teacher has requested she have more machines in the room then the 3 that are already there. The programs that she will need to be able to access in the classroom are all web-based or using the Office Program. The web browser is called Firefox (which is also available on the Windows side and is very popular) instead of Internet Explorer so there will be a learning curve for both myself, the teachers, and the students.
The plan right now is to get Ubuntu 9.10 (the latest "stable" version as of this post) up and running. Then I hope to add the Edubuntu add-on and get that working. From there I hope to add another piece of hardware into the mix called NComputing. This is an add-on card which allows me to break 1 machine up into multiple machines (virtual computing). According to their website, the Ncomputing software/hardware is compatible with Ubuntu. I will continue to post updates on my progress as I take the next steps. Any helpful hints or suggestions would be welcomed!