WordJong is a game that is a mix of Scrabble and Mahjong. I played the game with all the classes. In 7th grade we played four teams of three. There were 4 team captains in each group. The captains held the Wii-motes and worked the game board. The team members helped their captains find and create the words. We played in Party mode and the screen is divided into four quadrants. It was nice because the teams hand would only become solid in their quadrant so they always knew they were in the right space on the board. You can choose to play 8, 12, or 20 rounds in the Party mode (we chose 12 rounds).
Each team is given tiles that are stacked on each other. Each tile has a letter on it. So you can see some of the tiles but they are underneath other tiles so they can not be used yet. The object is to make the longest word possible with the tiles you have access to. Each time you remove a tile and use it to spell a word, additional tiles become available. You can also hold down the A button and shake the Wii-mote back and forth to receive additional tiles. However, when you do this you cover up some tiles that were on the board and accessible before the shake! Each round brings up the quadrants and tiles and each team tries to make their best word. Once one team completes a word (you set your word by hitting the B button on the Wii-mote) a timer appears in the middle of the screen and begins counting down from 45 seconds. Each of the remaining teams has this amount of time to make the best word they can. I like this element because it moves the game along and adds a little bit of tension to the game play. Players pull the tiles into spaces in order to spell their words. Once a tile is placed, you can remove it as long as the B button was not pushed. Once all teams have set their final words OR time runs out, you are taken to a screen which shows each team, the word they spelled, the points they were awarded for their word, and their current place (1st to 4th) in the competition. This also adds a little fuel to the fire as each round they get updates as to the current score. Each round is played the same way until the last round (12th for us) when a final winner is announced. There are special wild tiles or power-ups earned for various reasons (not sure what the reasoning behind when and why). These wild tiles are located under the team’s name in their quadrant. Some of them are really cool and the students love to use them and target teams or turn some tiles into ice tiles the other teams cannot use. Sometimes the wild tiles help their team and sometimes they hinder others.
Overall, I think this game is great and it is easy to play with a large group of students at one time. The 7th graders played all together and I split the 6th and 8th graders into two sessions. Teams of 2 or 3 work best I found. This game held all students’ attention and moved quickly. I also found students working towards trying to put together longer more complicated words to increase their score (showing some learning!). I also think this game creates a nice competition for the group while also providing a bonding experience for teams. Plus, the music in the background is great and relaxing.
Wednesday, October 20, 2010
Sunday, October 17, 2010
passwords, passwords, and more passwords
Well, the first thing I need to do is apologize to anybody who is still reading this blog. I know that it has been a long time since my last post! I have plenty of excuses, and 1 or 2 of them are pretty good (or at the very least honest) but I am just going to say that this is the first time I have had both the time and the idea at the same time so I could create a new post. I am going to make an effort to keep posting; with at least 1 new program a week in my future posts as well as some updates from past posts including new Wii posts coming soon! Welcome back!!
As we begin our 8th week of the school year, I am now just about ready for the school year to begin! As is the norm, it takes a few weeks to get everything up and running and working the way I want once all the students come back and start taxing all the equipment! We have several software packages which are causing some issues (not the least of which is the Ubuntu and NComputing combo - another upcoming post) but we are working through them as best we can. Special thanks goes out to all the teachers who are working hard to use the technology in their classrooms!


So as the students are using all of the different software packages in their classrooms or throughout the school, we are finding out that they are starting to rack up the passwords. They have passwords to log on to the computer, to log into their Google accounts, to use our Scholastic programs, to use our online Math program, our in house Math program, our Moodle program, the local newspaper site, as well as several other websites that require a generic login. I know that there are other passwords that I am forgetting as well. We try to make them the same (or at least similar) for easy remembering and some of our younger students write them down (I know that isn't secure but it has to be done). I also know that there are different programs which allow you to create 1 secure password and then put in all the others so the computer remembers them(Roboform is one that I am familiar with). They aren't supposed to share their passwords with anyone (I always tell them that if they have to share their passwords with someone, they can share it with their pet - as long as it isn't a talking bird or the Bush's Baked Beans dog) and they do a pretty good job of keeping them secret. But, it just is a lot of crazy words and phrases that they have to keep track of. It also means a lot of resetting on my part when they are forgotten!
Does anybody have a program or a process for keeping their students' passwords in order? I would love to hear any suggestions that work for others.
As we begin our 8th week of the school year, I am now just about ready for the school year to begin! As is the norm, it takes a few weeks to get everything up and running and working the way I want once all the students come back and start taxing all the equipment! We have several software packages which are causing some issues (not the least of which is the Ubuntu and NComputing combo - another upcoming post) but we are working through them as best we can. Special thanks goes out to all the teachers who are working hard to use the technology in their classrooms!

So as the students are using all of the different software packages in their classrooms or throughout the school, we are finding out that they are starting to rack up the passwords. They have passwords to log on to the computer, to log into their Google accounts, to use our Scholastic programs, to use our online Math program, our in house Math program, our Moodle program, the local newspaper site, as well as several other websites that require a generic login. I know that there are other passwords that I am forgetting as well. We try to make them the same (or at least similar) for easy remembering and some of our younger students write them down (I know that isn't secure but it has to be done). I also know that there are different programs which allow you to create 1 secure password and then put in all the others so the computer remembers them(Roboform is one that I am familiar with). They aren't supposed to share their passwords with anyone (I always tell them that if they have to share their passwords with someone, they can share it with their pet - as long as it isn't a talking bird or the Bush's Baked Beans dog) and they do a pretty good job of keeping them secret. But, it just is a lot of crazy words and phrases that they have to keep track of. It also means a lot of resetting on my part when they are forgotten!
Does anybody have a program or a process for keeping their students' passwords in order? I would love to hear any suggestions that work for others.
Wednesday, July 14, 2010
Another Open Source Program
 While I have been continuing to work with Open Source software I found a program that might be helpful to some on small budgets (whether you are using Windows, Mac or Linux). If you are familiar with Microsoft Publisher then you know it to be a desktop publishing software package which allows you to create many different types of paper based layouts (brochures, flyers, signs, etc...). It is relatively easy to use (there is no Ribbon Bar to try and figure out where your buttons went!) and can create just about any type of layout you need (there are 28 different options to choose from in the opening menu alone). It is not part of the Office Suite, unless you get the professional grouping (which is very expensive). It is a niche program, Google doesn't have anything to compare it to; and, with the exception of Adobe's InDesign (even more expensive then Publisher) there aren't too many similar programs. If you are used to the program, you will miss Publisher when it is gone (or at least I know I certainly do).
Enter the Open Source option. There is a program called Scribus. It is a free download and available for Windows (2000/XP/Vista/Windows 7), Mac, and of course, Linux. It's layout is similar to Publisher and allows you to make publications easily. There aren't the pretty step-by-step wizards that you will find with Publisher but if you need a desktop publishing program (familiarity with Publisher will help but isn't essential), I think this one will fit the bill nicely. If you give it a shot or you know of another program that can accomplish the same thing, please leave me a comment and let me know!
Saturday, July 10, 2010
Ubuntu snag
Hello! If you have been following this blog at all, you know that I am working on playing with Ubuntu in the classroom. I am using Ubuntu 8.04 LTS (the current version as of this post is 10.04) because it is the software that works with the NComputing boxes that allow virtualization. Well, as is usually the case, I have hit a snag that I can't get around right now. Like most people I have a Windows environment in my school with a server running Active Directory. All of the students log in to the server using their username and password and I control policy and so forth using Group Policy for each grade. Well, I am trying, unsuccessfully at this point, to integrate the AD with my Ubuntu box. I have read about Samba and I even found and downloaded the GUI (Graphical User Interface) program SADMS which automates much of the process (it edits the necessary files for you after you provide pertinent information). However, I keep getting an error message about changing the password on the server before I can get a Kerberos ticket. I can ping the AD server and I sync time servers so it isn't either one of those problems. I have changed password several times to no avail.
So, I am putting out a plea for help. If anybody has any leads or can direct me somewhere, I would be very appreciative.
I would also love to hear about any successful (or unsuccessful) OpenSource integrations into a classroom setting if someone would like to share!
Saturday, June 26, 2010
Tagxedo - the new Wordle
Most people are familiar with Wordle and its capabilities.
"Wordle is a toy for generating 'word clouds' from text that you provide. The clouds give greater prominence to words that appear more frequently in the source text. You can tweak your clouds with different fonts, layouts, and color schemes. The images you create with Wordle are yours to use however you like. You can print them out, or save them to the Wordle gallery to share with your friends" (copied from the Wordle webpage).
Basically, it can turn your text into a picture of text. You can enter the words in the editor or copy from a blog post or webpage. It has the words that are used more often in a larger text and gives a graphic picture to what can be a long set of text. There are some basic editing (size, color, font) but it is basically just a static picture. Still, a very cool tool. Here is a Wordle of a recent post involving the Wii in the classroom. It is pretty clear to see that I used the word "students" most often!

Now there is a new tool out there called tagxedo. If you look at the picture below, you can still see that it is a Wordle, but different. Tagxedo has taken it the next step further (someone always does) and has made it so you can create your Wordle into any picture shape you want. You just follow a few prompts, choose your image, choose your text and viola! you have yourself a Wordle 2.0! As you can probably tell, I used the same post to collect the words and you can see the similar sizes of the words ("students" still is the most used word in the post). You can make more changes with the text (besides the options with Wordle you can choose if you want the words to be horizontal or vertical or multiple, you have more color options and orientation options) and can integrate a whole different level with pictures!
A few points to consider. First, you have to install Microsoft Silverlight program to use Tagxedo, but it is a free download and install. Second, when you are choosing a picture, make sure that it is one where the outline makes sense. You can choose to have your words go on the inside or the outside of the picture, but if you can't make out the outline of the picture, it probably isn't going to turn out the way you would want. Third, the page says that you can upload your own picture free while it is in beta testing. I would guess, at some point it will go from a free site to a fee site and you will lose that ability. But until then, give it a shot!
"Wordle is a toy for generating 'word clouds' from text that you provide. The clouds give greater prominence to words that appear more frequently in the source text. You can tweak your clouds with different fonts, layouts, and color schemes. The images you create with Wordle are yours to use however you like. You can print them out, or save them to the Wordle gallery to share with your friends" (copied from the Wordle webpage).
Basically, it can turn your text into a picture of text. You can enter the words in the editor or copy from a blog post or webpage. It has the words that are used more often in a larger text and gives a graphic picture to what can be a long set of text. There are some basic editing (size, color, font) but it is basically just a static picture. Still, a very cool tool. Here is a Wordle of a recent post involving the Wii in the classroom. It is pretty clear to see that I used the word "students" most often!

Now there is a new tool out there called tagxedo. If you look at the picture below, you can still see that it is a Wordle, but different.
 Tagxedo has taken it the next step further (someone always does) and has made it so you can create your Wordle into any picture shape you want. You just follow a few prompts, choose your image, choose your text and viola! you have yourself a Wordle 2.0! As you can probably tell, I used the same post to collect the words and you can see the similar sizes of the words ("students" still is the most used word in the post). You can make more changes with the text (besides the options with Wordle you can choose if you want the words to be horizontal or vertical or multiple, you have more color options and orientation options) and can integrate a whole different level with pictures!
 A few points to consider. First, you have to install Microsoft Silverlight program to use Tagxedo, but it is a free download and install. Second, when you are choosing a picture, make sure that it is one where the outline makes sense. You can choose to have your words go on the inside or the outside of the picture, but if you can't make out the outline of the picture, it probably isn't going to turn out the way you would want. Third, the page says that you can upload your own picture free while it is in beta testing. I would guess, at some point it will go from a free site to a fee site and you will lose that ability. But until then, give it a shot!
Thursday, June 24, 2010
Ubuntu and Windows
Summer is on and of course as teachers we are doing nothing, right? This is that time of year where apparently we just sit around and do nothing and get paid, right? These months (July-Aug) are the reason why every teacher became a teacher, right? I am sure that if you are a teacher, or even thinking of becoming a teacher, you have probably heard one of these comments recently. If only that were true, huh? This is the time of year when I can get most of the physical work done! Without students I can refresh machines, move around ones that have broken, are breaking, or will just plain die any day now. Purchases are made, planning happens, and things keep going! If you are a teacher reading this post, remember this is our down time so relax and enjoy! :-)
OK, now that I have put away my soap box (thank goodness I don't have a large audience to worry about influencing!) I move on to the reason for my post. In a recent post from May I talked about setting up Ubuntu (Open Source, i.e. free) software and NComputing (Virtual computing, i.e. more computers without the equipment) hardware for a cheaper alternative to getting to a 1 to 1 ratio of computers to students. After having a discussion with reps from the company I do most of my purchasing from, I found out the licensing necessary to use Windows with the NComputing boxes. Basically, to be compliant (and legal) with the companies, I have to purchase a server license (2003 or 2008) for the host machine, a CAL (client access license) for each of the client machines, AND a RAC (Remote Access client license) for each of the client machines. Now, depending on which tier you are on with Microsoft, these purchases vary in price. Needless to say, it will cost approximately $150-$200 just for the OS licenses for me to put three computers in any classroom (1 host and 2 virtual). Of course, if I want other software, like Office or Publisher, or whatever, I have to pay for three separate licenses. So quick math tells me that if I want to do 10 classrooms, I have to put out $2000 for just the ability to run Windows on those machines. With a free operating system on the computer which is broken up into three machines (or up to 11 if you use the bigger x550 solution) it costs me nothing. Nada, zip, zero. Being under a tight budget, I like not having to put out that money (and my principal likes it even more)! It all comes down to what you want to do on that machine. If you are looking to get another lab just for Internet research, this solution might work for you. If you can use the open source program OpenOffice to do your word processing, spreadsheet, and presentations then this solution might work for you. It is, at the very least, something to look into. Let me be clear, I don't believe it will ever replace Windows, but it might be another option for teachers. Here is an article from THE journal giving a little more information.
OK, now that I have put away my soap box (thank goodness I don't have a large audience to worry about influencing!) I move on to the reason for my post. In a recent post from May I talked about setting up Ubuntu (Open
Tuesday, June 15, 2010
End of Year thoughts on the Wii

Well, our school year has come to a close so Chris and I did some final wrap-up of the Wii in the classroom project. We discussed the positives, the negatives, and throw around some future plans with using the Wii for next year and beyond. All in all using the Wii this year has been a positive experience and I can't thank Chris enough for working with me (heck, running most of the show!) as we try to implement a new tool for learning.
Positives
Student engagement- could not be more engaging- when something can hold a 10 year olds attention for 45 minutes on the concept of ratio- we are good to go!
Group/team building aspects- I saw the beginnings of great team building opportunities with the Wii in class- I saw it with the Brain Age contests we did and when the 6th graders played Mario Kart for fun- Finding some games where the team aspect is emphasized might go a long way for bringing together some classes
Using the Wii allowed me to address standards based skills (for example comparing and ordering integers and identifying equivalent ratios) in depth in one class period- the games held their attention for the full class period- allowing many examples and practice problems and also allowed me the ability to see over time who already had the skill and who was struggling- then I could make sure to focus in on those who needed help. When you have the prolonged attention span on one core skill- it gives the teacher the assessment time needed in the classroom
Using the Wii gave me the opportunity to address certain 5th grade math skills that sometimes (a lot of the times) get pushed to the side in order to make sure other more prominent skills are mastered before middle school (such as addition, subtraction, multiplication and division with whole numbers, fractions, and decimals). By using the games to teach about integers, ratio, and equivalent ratios, I utilized three class periods (instead of trying to teach the skill using the text book lessons and chapters (at least one week for each skill) and feel as though the skill was taught in a much more retainable manner- it is all about student engagement and attention.
Student excitement- 5th grade Math exciting- film at eleven- who would have thought?
Teacher excitement- never mind the kids- I had fun using the games and being amazed at students who normally have trouble paying attention in class for five minutes- ready to go after 35 minutes- still doing the math and wanting to play again! It is a great feeling to teach a new skill and see a student grasp it- the Wii lessons let me do that with many of the students in just one class period.
Increased incentive for class parties- students wanted to play the Wii during class party times and this served as a great party feature and good incentive.
Increased my professional interest in ed tech in general- looking for new ways to use the Wii- like the online http://www.arcademicskills.com/ Wii games page and all the blogs out there talking about using the Wii
Drawbacks
Expense of system, pieces, and games
Pre-planning time (including finding games with educational applications, playing through the games to plan out lesson structure and set up, etc.)
Limited educational uses (so far) which are standards based
Future Plans
Use Are you Smarter than a 5th grader with the small 7th grade Brain Bowl group- not only to build knowledge and speed of response, but also team skills.
Crossword Wii game in LA- try to incorporate vocabulary- either those words used in the game or additional words if you are able to add your own to the game.
Super Hero game to tie in with the Super Hero writing, reading, and creation unit (Superman For All Seasons- graphic novel).
Brain Age Academy- do tests with all middle school students to give all of them an idea of their learning styles and strengths and weaknesses- allow time (outside of class) for students to improve skills throughout the year.
Create Miis for students over the summer and then allow them to customize their Mii when they have time. Maybe use the Check Mii Out Channel (a free download) to see about working on their Mii's from different controllers and sending them to the classroom.
I like the idea of using the Wii as an incentive in class.
Hope to inspire more staff to utilize the Wii next year- especially math uses that we have already planned out.
Download more options from the online Wii channel. There are many puzzle games (being careful to keep track of ratings and appropriateness of games) including Aha! I got it Escape, Art of Balance, Brain Challenge, Neves Plus, Loupos, Sudoko Challenge, World of Goo, just to name a few.
Use the Everybody Votes Channel (which is a free download from the Wii Channel) to allow students to see they are part of a global community and that their voice counts.
Virtual Pets - My Aquarium game allows the students the ability to take care of a fish tank - including feeding the fish. Each morning during homeroom/morning time you have someone whose job it is to take care of the tank! The cleanest pet of the year for sure!
Friday, June 4, 2010
Using clickers in the classroom 3

Well as our year is rapidly winding down, I wanted to get a last (or maybe 2nd to last) post in here about the using the clickers in the classroom. My last post was not the most flattering and I wanted to give an update on usage in the classroom. We have met with mixed results.
I used them twice, once for group quiz grades using BrainPop and once just for classroom questions as we were working through  the lesson. If you use BrainPop in your classroom then I can easily suggest that you look into the clickers. After the lesson you can give a quiz on the information that was just presented. Well, instead of just getting one person's response and clicking the answer, you can have each person answer using the clickers and then click the answer that corresponds with the majority of responses. Then you can save the responses from all the students and go through the results to answer the question how effective was the movie? It is a great way to integrate the whole room with BrainPop!
 the lesson. If you use BrainPop in your classroom then I can easily suggest that you look into the clickers. After the lesson you can give a quiz on the information that was just presented. Well, instead of just getting one person's response and clicking the answer, you can have each person answer using the clickers and then click the answer that corresponds with the majority of responses. Then you can save the responses from all the students and go through the results to answer the question how effective was the movie? It is a great way to integrate the whole room with BrainPop!
The 2nd time I used the clickers was to have the students answer some questions as we were working through a lesson. The hardware all worked just fine, and I think as the novelty of the clickers wears off, so will the time it takes to actually use them (all of the students are still enamored with the total count at the top, and don't even get me started on the question feature!) to get answers. What is great is the immediacy of the feedback. You can quickly see how much of the class understood what you are talking about and review right then if necessary.
One feature that we were introduced to that needs to be mentioned is the Response Table. The response table is your friend! To put the response table on a slide choose Insert Object, Response Table, and then Fixed Object (in Office 2003). What the response table does is put a small table on the bottom of your question slides. There is a numbered box for each clicker in the room. When the student clicks the clicker, the box with their number (corresponding to the number that is on the back of the clicker) lights up. If they click it a second time, it changes to a different color (to let them know they changed their answer). The students can clearly see that the computer has registered their answer. It is much easier than the small number in the bar at the top of the slide which just advances one number as each student clicks an answer. You will want to put the response table on all of your slides.
Wednesday, May 26, 2010
Ratios with the Wii

Today we decided to give another pre and post test to see if we could recreate our success with the Wii and numbers on the number line (see this post for more info). Chris wanted to do a lesson on ratios. All of the students came into the lab and took our pre test using Google Forms.
Here are the questions and some of the answers from a group of students.
 As you can see, the answers were all over the place. She began by discussing ratios and the vocabulary involved. She talked about the relationship between the first number and the second and the format which ratios can take (using the word "to", posted with a semicolon or as a fraction). We made a point to remind the students that the relationship that you are asking for will dictate the results of the ratio. It will be wrong if you put the correct numbers, but in the incorrect order! After this discussion we used the Wii to bowl.
 We had 4 players registered and each student was able to bowl one frame. This way we got all the students involved in game play. After each throw Chris would ask for a different ratio. For example, the ratio of pins hit down to total pins. Or pins hit down to pins remaining. After a few frames we increased the difficultly a little and asked questions like the ratio of odd numbered scores to even numbered scores. Each time the students had to write the ratio in multiple ways. We were able to complete several frames (but not a complete game in the time allowed). Bowling lended itself to lots of ratio questions. We were able to stop play in between each bowler and ask a different question without interrupting game play/learning. There were plenty of numbers and plenty of options. Later that day (you can see the timestamp in the first column) the students took the post test (the same exact test). Here are the results (again) of some of our students.
 While there are some formatting mistakes (some of which can be attributed to Google Spreadsheet trying to "help" with the formatting) you can see, we had much better results, but still have some students who didn't get all aspects of the concept. We are working on that!
As you can see, the answers were all over the place. She began by discussing ratios and the vocabulary involved. She talked about the relationship between the first number and the second and the format which ratios can take (using the word "to", posted with a semicolon or as a fraction). We made a point to remind the students that the relationship that you are asking for will dictate the results of the ratio. It will be wrong if you put the correct numbers, but in the incorrect order! After this discussion we used the Wii to bowl. We had 4 players registered and each student was able to bowl one frame. This way we got all the students involved in game play. After each throw Chris would ask for a different ratio. For example, the ratio of pins hit down to total pins. Or pins hit down to pins remaining. After a few frames we increased the difficultly a little and asked questions like the ratio of odd numbered scores to even numbered scores. Each time the students had to write the ratio in multiple ways. We were able to complete several frames (but not a complete game in the time allowed). Bowling lended itself to lots of ratio questions. We were able to stop play in between each bowler and ask a different question without interrupting game play/learning. There were plenty of numbers and plenty of options. Later that day (you can see the timestamp in the first column) the students took the post test (the same exact test). Here are the results (again) of some of our students.While there are some formatting mistakes (some of which can be attributed to Google Spreadsheet trying to "help" with the formatting) you can see, we had much better results, but still have some students who didn't get all aspects of the concept. We are working on that!
We had good feedback from the students. They enjoyed bowling and seemed to do a good job with the ratio options.
Tuesday, May 25, 2010
Follow up on negative numbers with the Wii

A few weeks ago we gave our students a pre-test about putting numbers in order from smallest to least (including negative numbers - you can see the post here). After the pre-test we played the Wii game Brain Age, specifically Balloon Burst.
 Then we gave the post test. If you look at the original posting, you can see the great growth that our students showed (from 4 students getting the correct answers to 18 students getting all correct answers). Today, we opened the form again and had the students complete the same post test, just to see if what we did stuck with them over time. Success! A little over 90% of the class (91.3%) had no problem and received a score of "A" on the post test. Chris and I couldn't be happier.
Friday, May 21, 2010
Using the clickers in the classroom 2
Today we used the clickers with a quiz that Chris was giving in the classroom. Putting it midly, it didn't go well! We were not able to get the clickers to work at all at first. Since we only have one set, earlier in the week we had moved the clickers AND THE RECEIVER to another classroom to use it in there. Once we brought it back into the 5th grade room Chris plugged it into a different USB port on the computer. Because teachers do not have admin access to their machines (for different security reasons), the receiver did not get fully setup and would not pick up the clickers when the students started clicking (or at least that is my best guess at what happened). Once I pulled it out of that plug and put it back into the same port as when I installed it (with admin rights) they seemed to work again. Of course, by the time I figured this out after various troubleshooting efforts, we were 15 minutes into the period and Chris had to go back to paper and pencil so she could get through the assignment.It was user error that was the problem, but I wanted to share what may be a common problem/scenario in classrooms.
Friday, May 14, 2010
Using the clickers in the classroom
So, we used the clickers from Turning Technologies in the classroom today. Chris wanted to give a quick review grade for the work in 5th grade Geometry and she wanted to give a Spelling test in 6th grade that would be similar to the type that the students would see during our standardized tests.So, using the TurningPoint software (which comes with the clickers, or you can download from here) she made some tests. The Geometry test had a question and 3 possible answers (A, B, or C). The Spelling test was a little different in that it asked which word was spelled correctly and then gave 4 options for each word (A, B, C, or D).
The TurningPoint software is pretty slick in that, using PowerPoint, you put up the question and you can see a box in the top right of the screen that tells you polling is open.
 The students hit the letter that they think is correct (you can hit the button as many times as you want but only the 1st click is the one that records) and the box tells you how many responses it has received (the receiver is a USB dongle plugged into the computer and has good range in our classrooms). There is also a question mark button on the clickers. If you hit that button the user feedback number will go up one. You can't tell which one it is, but you can clearly see, without interruption, that someone has a question. Once you have all the clickers' answers, you can mouse click the screen (or touch the SMART board to slide advance) and a graph (which ever graph you chose in the setup - there are bar and pie options) will show immediate results of the overall answers. No individual clicks are shown, you can just see how many people chose answer 1, 2, and 3. But the students still liked to see that they were, or were not the only people to choose that option. We had cheering and ohhs when they saw how many clicked the choices. Using the software you can also tell the computer which one is the correct answer (the format is different if you are using Office 2003 or 2007) and it will basically grade the test for you. Since our students each have a number (for text books and such) we just made sure that they each got the clicker with their own number. You can also set up groups for each grade with student's names (we haven't gotten this far yet) so you know which students answered which question. After the presentation is complete you go through the information using the Participation Monitor. The results show each question, each clicker, and what answer that clicker chose. Chris had more set up work before the test, but after the test the work is done. The software will tell which clicker got the wrong answer for each question.
We are going through a training session next week so we are looking forward to learning how to use the clickers more effectively. Stay tuned for more info.
Tuesday, May 11, 2010
Ubuntu & NComputing working together

After doing some online research (and sending a message to tech support), I found out that the latest Ubuntu version which NComputing supports is 8.04 LTS (Long Term Support). As of this writing, the newest version of the software is 10.04 (which just came out in April). I don't know why the NComputing software has not been upgraded to work with the latest software but since Ubuntu is on a 6 month update cycle I can only assume that they are working on a newer version. I also have to say with great candor that I do not know enough about the different versions to have any idea what the differences are between the newest version and the older 8.04. So, I guess we will overwrite version 9.1 and downgrade to 8.04!
The first thing I had to do was download this version. I did this from the machine that had Ubuntu version 9.10 on it (since I was going to have to downgrade anyway). Version 8.04 does fit on a CD disk (it is 700MB in size) so installing it on the computer was very simple. All I had to do was download the file, right click on it and burn it to CD (one of the options by default in Ubuntu 9.10). Once the CD was created I rebooted the machine. On reboot it read from the disk and prompted me with 7 questions (all of which I chose the defaults) and began to install (essentially the same installer that 9.10 had). The installation itself took literally 10-15 minutes. After the install is complete you must reboot the computer. You will have to log in with the username and password that you create during the install.
After the reboot and log in it was time to download the NComputing file (again). You can get that file here. I downloaded the file on to the desktop and double clicked the file. WARNING - YOU MUST HAVE AN ACTIVE INTERNET ACCOUNT FOR THE REST OF THE STEPS HERE. The first time I tried to install the file I received an error message telling me that it couldn't open a file and the install box was grayed out. I then plugged in the Internet cable (which I had removed to plug in another machine) and tried the file again. This time it worked just fine and I was able to install. So I guess it looks for an active connection before the install occurs. After I found this little tidbit of information out the rest of the install was simple. Double click the install package button and hit the Next button when prompted (it will happen several times). (The download link above also has a link to a .pdf file that gives specific directions on how to install the program if you need more help.) Once you have installed the package you will get a message that the installation is complete. Close the install window and reboot the computer. From my experience you must reboot before you try to do anything with the NComputing boxes.
Once the machine comes back up you need to log in to the host machine. As the computer was loading, I was getting something on the virtual machines; but just a screen that said the x350 card has been initialized. Nothing else. Now, I don't know if this has anything to do with my getting things to work, but when I went to the upgrade, I was met with a window telling me that the list I had was old and I needed to download a new list. I clicked the OK box and a new list of files was downloaded. That was all that I did. I want to be clear, I didn't install any updates or any other machine file, just the list of files available (as a matter of fact the directions from NComputing are very clear about NOT downloading updates to the OS). After this list update I rebooted the computer and I was able to see the same initialized screen on the virtual machines. But then, I got a new message that the station had been unlocked and low and behold, the screen came up with a login prompt! I don't know if the two steps were related or if there was something special about the 2nd reboot, I just know that it worked for me! At this point you need to follow the directions to register the card with the company and go from them. I haven't had any problems booting up the computer or the virtual boxes with about a half dozen boot-ups since it was working. I will continue to post updates as we use the equipment.
Sunday, May 9, 2010
wii day 8 finishing up Meteor Math

This week we wanted to make sure that everybody else who missed playing last week had a chance to play the Meteor Math game. So the first thing we did was turn on the machine and make sure that it still worked out on the Internet, it did! Whew, first hurdle down. Then we had to get to the site, go to favorites and click on the link, BAM we are there, second hurdle down. Now we have to review the different activities we did last week, Fact Families, Multiples, Factors, and Prime Factorization, the students all seem to remember at least one part of each of the activities! Man, three for three! We play one round each with the different activities letting the students come up and play - either completing a round or until they get hit by the meteor.
 I will give one example for each activity. For Fact Families we got 12 - so one was 12 x 1. We get it again so it is 6 x 2. For multiples we get a 7 - so it was 7, 14, 21, 28, and 35 (we had them go up 5 multiples). For Factors we got 15 - so whe had 1, 3, 5, and 15. For Prime Factorization we got 24 - so it was 6 x 4 which gets broken down to 2 x 3 and 2 x 2. The final answer would be 3 x 2 cubed. All of this went pretty well. Plus, we had several students who were able to do the math including one of our star Math students who got through 27 problems in 1 minute (the fastest in the class by far).
So, Chris decides to add one more activity into the mix, Exponents. This one was where we hit a bit of a wall with the students. Several students had a hard time with the idea that you have to multiply the number however many times the exponent says. Many of them wanted to just multiple the number by the exponent. So after a little pause of play we went around and made sure that everyone was on the same page. We went through a few examples on the board (6 squared, 4 cubed, etc) and then had them do the rest at their seats. All in all I believe it went well.
Just some ending notes. Again I heard some "This is easy" during the Math problems and "don't die!" and "it's that one right there!" from the students while their classmates were trying to find the correct meteor to take out. The only vocab we had to review was Prime and most remembered what it was. We gave the students a fair amount of praise and they still seemed to enjoy working the problems.
Tuesday, May 4, 2010
Student Response Systems (Clickers)
Chris received a bit of good news a few weeks ago - she had won a grant! The prize included a class set (32) of "clickers". The clickers are a Student Response System (SRS) where each student gets their own little receiver which allows them to vote for any question the teacher asks. While there are many different companies which provide these systems, the company that was part of the grant was called Turning Technologies. The product name is ResponseCard RF (Radio Frequency) and there is some info about this particular model here.We just opened the box today and I wanted to post some initial information. First off, when we opened the box we found a carrying case.

Inside there was a CD, 32 clickers, and some paperwork.

Each one of the response systems is numbered (as well as the case for easy placement).

Here is a closer picture of the "clickers" themselves (sorry it is a little blurry, I was borrowing a camera).

There are several different options for the "clickers" and this is one of the basic models (there is no LCD screen or ability to put in short answer responses); but, they are still a really cool technology and did I mention that Chris won them?! :-)
Before you can begin with the software, you have to put all of the "clickers" on the same frequency so the computer will "see" the responses. To do this you have to click the Ch button in the bottom left and then hit the channel you want to put them on (I chose 01). Then just push the channel button again. The small green light on the SRS will light solid green for a few seconds and you are good to go. You have to put all of the clickers in the same set on the same channel so I repeated this step 32 times! My guess is that if you had several class sets of clickers they could each be used in different rooms as long as they were all set up on different channels.
After that, I had to download the Turning Point software (TurningPoint 4.2.2 as of this writing) from the web and install it on the computer. It basically is a specific version of PowerPoint which adds a special toolbar and integrates the questions/answer portion of the SRS into PowerPoint. To use the software, you put the question at the top, put the answers (True/False, Multiple Choice) in the middle and then you can begin the show. When you put up the question there is a little box that appears in the top right hand corner of the screen and lets you know that polling is open. It will count up for each answer that is pushed on the clicker (you can only answer once). When you have all the answers accounted for you can click your mouse (like you were going to the next slide) and a graph will appear showing the answers chosen.
There is also another software download (the same link as above) called TurningPoint Anywhere 2.2 which allows you to just put up the polling software on the computer screen with nothing else. You can just ask the question verbally (or put it up on the screen in another program besides PowerPoint) and have the students answer with the clickers. You then can close the polling box and the results will appear on the screen (in a graph form). I can see easy integration with Brain Pop quizzes through this software. The whole class can now answer the question before we show the answer and Chris can see how many of the whole class knows the answer!
There are other pieces of software to download and use and there are a lot more options that we haven't gotten into yet. I will continue to post updates about the clickers the more that we use them. I know that Chris is interested in using in the classroom so I am sure we will be learning more soon!

Inside there was a CD, 32 clickers, and some paperwork.

Each one of the response systems is numbered (as well as the case for easy placement).

Here is a closer picture of the "clickers" themselves (sorry it is a little blurry, I was borrowing a camera).
There are several different options for the "clickers" and this is one of the basic models (there is no LCD screen or ability to put in short answer responses); but, they are still a really cool technology and did I mention that Chris won them?! :-)
Before you can begin with the software, you have to put all of the "clickers" on the same frequency so the computer will "see" the responses. To do this you have to click the Ch button in the bottom left and then hit the channel you want to put them on (I chose 01). Then just push the channel button again. The small green light on the SRS will light solid green for a few seconds and you are good to go. You have to put all of the clickers in the same set on the same channel so I repeated this step 32 times! My guess is that if you had several class sets of clickers they could each be used in different rooms as long as they were all set up on different channels.
After that, I had to download the Turning Point software (TurningPoint 4.2.2 as of this writing) from the web and install it on the computer. It basically is a specific version of PowerPoint which adds a special toolbar and integrates the questions/answer portion of the SRS into PowerPoint. To use the software, you put the question at the top, put the answers (True/False, Multiple Choice) in the middle and then you can begin the show. When you put up the question there is a little box that appears in the top right hand corner of the screen and lets you know that polling is open. It will count up for each answer that is pushed on the clicker (you can only answer once). When you have all the answers accounted for you can click your mouse (like you were going to the next slide) and a graph will appear showing the answers chosen.
There is also another software download (the same link as above) called TurningPoint Anywhere 2.2 which allows you to just put up the polling software on the computer screen with nothing else. You can just ask the question verbally (or put it up on the screen in another program besides PowerPoint) and have the students answer with the clickers. You then can close the polling box and the results will appear on the screen (in a graph form). I can see easy integration with Brain Pop quizzes through this software. The whole class can now answer the question before we show the answer and Chris can see how many of the whole class knows the answer!
There are other pieces of software to download and use and there are a lot more options that we haven't gotten into yet. I will continue to post updates about the clickers the more that we use them. I know that Chris is interested in using in the classroom so I am sure we will be learning more soon!
Friday, April 30, 2010
wii - day 7 continued - playing the game

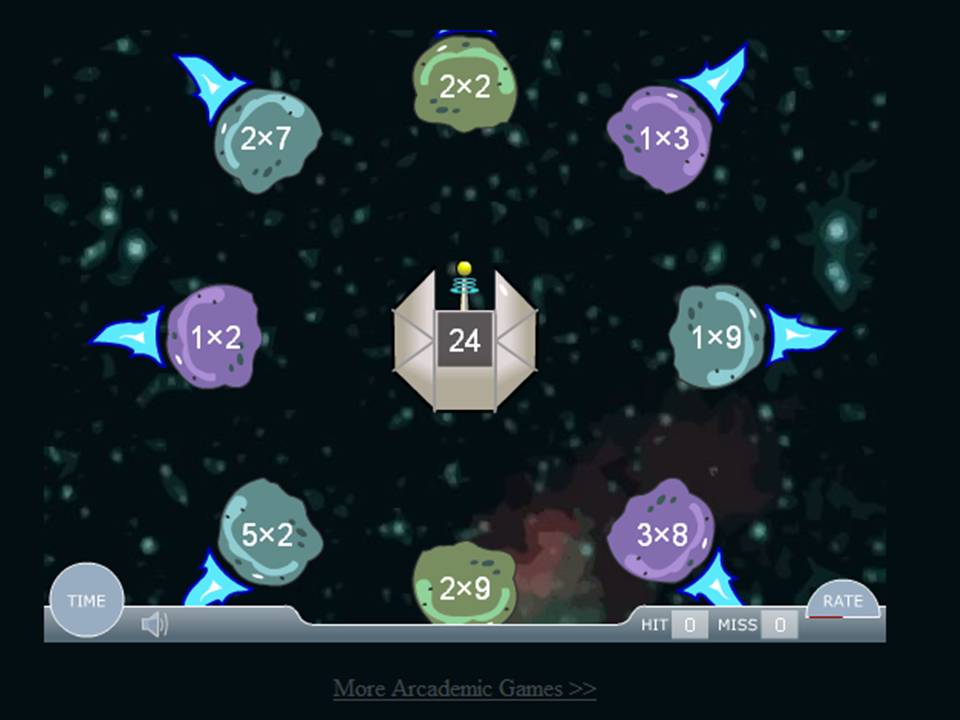
So, after the last post about getting the wireless up and running it is time to talk about playing a game! So we have been using a website called Arcademic Skill Builders (www.arcademicskillbuilders.com) for a little while now to work on our Math facts. It is a great site based in flash where the students can play against each other in the classroom (or anywhere for that matter) in various Math skills (as well as Grammar skills). Well, the site also has a Wii page where you can play a handful of the games on the Wii. The first suggestion I will make is to save the page in the favorites. Then it is only 1 mouse click away. From here you can click on whatever game you want to play and get started. We chose the Meteor Multiplication game.
 Basically, you are the gun in the middle and there are meteors coming towards you. You have an answer on your gun and you have to choose which meteor coorespondes to the number on your gun. But be careful, some of the meteors have the same answer but are at different distances. If a meteor gets too close you blow up. Shoot the wrong one and you blow up. The round goes for a while (there is no specific number of correct problems - but there is a time limit which you can edit somewhat) and then you complete that round and move on to round 2. Each round they move a little closer and move a little faster. It was just a review, but a review that the students enjoyed more! Each student came up and played either one round or played until they got blown up. Plus, Chris decided to jazz it up a bit. We wanted to make sure that everybody was involved in the class, not just the people playing the game. So we had the students at their desk get out their Math notebooks and do something different each 6 people.
The first 6 people we did Fact Families for each problem. So if the answer on the gun was 12 then the students had to write down 1x12, 2x6, 3x4. We had 6 students come and go and kept track of the students answers on the notebook.
The second 6 people we did Multiples. So if their gun said 7 then the students had to write down 7, 14, 21, 28, and 35 (we capped it at 5 numbers so they could work on each one).
For the third 6 people we did Factors. So if their gun said 14 then the students wrote down 1, 14, 2, and 7. At this point we had a little review about Prime and Composite numbers vocabulary.
For the last 6 people we chose to do Prime Factorization! Do you remember prime factorization? It is the tree branches to take the numbers down to prime numbers. So, if they got the number 32 then they had to do this

We didn't get a chance to go through all the students so we will continue to finish up the next time we get a chance. More to come!
Just a couple of notes. Things I heard during the game- "This is so awesome". A lot of "don't die"! when the asteroids were coming towards the guns. A couple of students were saying how hard it was but they were trying to get it done.
Sunday, April 25, 2010
Wii, day 7 - setting up the wireless information
 It has been a while since we used the Wii in the classroom. With our short week from Spring Break and then the Spring festival we had, there just hasn't been much time to get it all together. So, this week Chris and I worked at getting back into the swing of things. During Spring Break, I was able to get the wireless access points (Cisco 1000 series - older models which are end of life, but still work great) up and running throughout the school. So, what's the first thing that I need to do with them? Well, get the Wii up and running on the Internet of course! As with everything in technology, it should have been a cake walk. Just double click on the wireless adapter, auto find the SSID, put in the password (of course there is a password!) and cruise the web. And as with everything in technology, it just didn't work out that way! Here is a page with directions from Nintendo for setting up a wireless connection(BTW, the Nintendo site is a pretty good one with info on errors and pictures/videos to help with the install). I wasn't able to just double click and go for whatever reason. When I did a scan for the SSID, the console would see it and give me the correct security settings. However, when I tried to put in the correct password I would not be able to get on the web. It kept coming up with different error codes that had to do with wireless connection problems. So, after some conversations with a friend who is very knowledgeable with Cisco equipment (thanks Chuck!) we wound up creating another wireless SSID that didn't have the same level of security. I turned off the broadcast feature and created all the settings manually. If you click on the Manual Setup button (shown here) you can enter in all the settings.
 From here you add the SSID (again, I turned off the broadcast so I had to add it manually).
Then choose the type of security and put in the encryption password.
 From here we manually put in the IP address and DNS address (if you don't know what these are you should be able to ask the tech person at your school).


The last setting is the easiest. Don't change it! Just leave it set at 0 and hit save.

At this point I was able to run the connection test and see it hit the Access Point. In just a few seconds I was talking on the Internet. The first thing the console wants to do is download the latest firmware from the web. You get the warning that if you have modified the console any that it may become unusable when the upgrade occurs (at least it gives you a warning/reminder). We did the upgrade at that point and it seemed to be steady connection and it worked the following day when we were playing a game. The next thing that we did was download the Internet browser for the Wii. Here is a page on specifically how to do this but I will give the highlights.
One thing, we did occasionally lose the connection for a second or two. I hope that this is just because the wireless lost signal (some kind of interference) for a moment. It did come right back but I did have to reset the game settings once it lost the wireless so it is a inconvenience, but certainly not a deal breaker. I think the reset was just because I was on a web page through the browser. If I had been playing a game I don't think there would have been the same reset problems...
 From here we manually put in the IP address and DNS address (if you don't know what these are you should be able to ask the tech person at your school).

The last setting is the easiest. Don't change it! Just leave it set at 0 and hit save.

At this point I was able to run the connection test and see it hit the Access Point. In just a few seconds I was talking on the Internet. The first thing the console wants to do is download the latest firmware from the web. You get the warning that if you have modified the console any that it may become unusable when the upgrade occurs (at least it gives you a warning/reminder). We did the upgrade at that point and it seemed to be steady connection and it worked the following day when we were playing a game. The next thing that we did was download the Internet browser for the Wii. Here is a page on specifically how to do this but I will give the highlights.
- Select the Wii Shop Channel from the Wii Menu. If you have not previously accessed the Wii Shop Channel, you will need to read and agree to the User Agreement.
- Once the welcome screen is displayed, select "Start Shopping."
- Select "Wii Channels" from the Wii Shop main menu, then select "Internet Channel." Select "Yes" if you agree to the amount and to confirm the download. THERE IS NO COST to download the browser.
- After the Opera Browser finishes downloading, the "Internet Channel" will be added to your Wii Menu.
One thing, we did occasionally lose the connection for a second or two. I hope that this is just because the wireless lost signal (some kind of interference) for a moment. It did come right back but I did have to reset the game settings once it lost the wireless so it is a inconvenience, but certainly not a deal breaker. I think the reset was just because I was on a web page through the browser. If I had been playing a game I don't think there would have been the same reset problems...
Saturday, April 24, 2010
ubuntu update
So in the last two weeks I have been working on trying to get the Ubuntu computer up and running with the NComputing boxes attached to it. First things first, getting Ubuntu installed. This turned out to be more difficult then it probably should have been because of the equipment I am using. The first machine I was trying to install the OS on to was an older computer without a DVD player (it was a Dell Pentium III - like I said, an older computer). The latest version of the OS (Ubuntu version 9.10 as of this writing) can be downloaded as a bootable image, but it is over 3 GB in size so it has to go on a DVD disk. So that was problem #1. Of course, there is always the USB key option, but the BIOS on the machine was sufficiently old enough that booting to the USB drive isn't an option. So, the answer to that little quandary was to install the older version 9.04 (whose bootable image fit on a CD) and then update to 9.10 (the update is available via either the internet update within the software or you can download the update-which also fits on a CD disk).
Then on to problem #2, trying to put Edubuntu on the machine. In case someone isn't familiar (and up to about a month ago I didn't know what I was talking about either!), Edubuntu is a derivative of Ubuntu which has all of the educational programs already installed on it. While you can get them each as individual downloads, it is easier to get the whole version at once. They have it broken up into primary, secondary, and tertiary modules and including all kinds of different pieces of software, all free. Again, version 9.10 is too big to fit on a CD so I had to use version 9.04. Well, I guess that once I updated to version 9.1 Ubuntu, I couldn't put the 9.04 version of Edubuntu (I kept getting an error saying that it wouldn't install). So, I had to wipe the machine, install Ubuntu 9.04 from the CD and then install Edubuntu 9.04 and then upgrade to Edubuntu 9.10. Not too big of a deal, but time consuming. With the older equipment, an install takes about 40 minutes. And then another 30 minutes for the Edubuntu install. Ahhh, but that falls right into problem #3.
Once I had the 9.10 Edubuntu software installed, I completely lost my ability to open the My Computer option on the computer OR use the CD-ROM drive! For whatever reason, I could not use the graphical interface at all (nor could I get the CD-ROM drive to do anything else but eject from a DOS prompt). My assumption is that the older hardware was a problem. So, to review, at this point I have the latest version installed on the computer, but I can't do any of the graphical interface things that make it work like Windows. Needless to say, not a great showing. So, I am going to have to find some newer hardware and see what happens. And so that is where I will end for now. More to come!
Sunday, April 11, 2010
open source ongoing project in classroom
One of the issues that I have to work with is budget. Just like everyone else in the world, our budget is tight! I like the challenge and we are lucky that there are many different companies that give their products to schools at reduced prices or free of charge! Of course, there is also open source software which has been around and used in different organizations for years. I am looking at beginning to use the open source software operating system Ubuntu in our classroom. Ubuntu is a form of the Linux kernel and there are many different "flavors" of the software. The interesting part of Ubuntu is that there is an add-on called Edubuntu which has all kinds of educational software added into the OS. They are broken up into 3 packages- primary, secondary, and tertiary and add all kinds of functionality to the program for a classroom. It also includes a completely free version of an office productivity suite called OpenOffice. It has a word processing program, a spreadsheet program, a presentation software program, a database program and a graphics program. I am going to be working on installing the software on to some recently donated machines and try to get them up and running into one of our classrooms where the teacher has requested she have more machines in the room then the 3 that are already there. The programs that she will need to be able to access in the classroom are all web-based or using the Office Program. The web browser is called Firefox (which is also available on the Windows side and is very popular) instead of Internet Explorer so there will be a learning curve for both myself, the teachers, and the students.
The plan right now is to get Ubuntu 9.10 (the latest "stable" version as of this post) up and running. Then I hope to add the Edubuntu add-on and get that working. From there I hope to add another piece of hardware into the mix called NComputing. This is an add-on card which allows me to break 1 machine up into multiple machines (virtual computing). According to their website, the Ncomputing software/hardware is compatible with Ubuntu. I will continue to post updates on my progress as I take the next steps. Any helpful hints or suggestions would be welcomed!
Wednesday, March 31, 2010
Wii - Day 6

Today we finished up with the same game that we used the last time we pulled out the Wii, Internal Clock. We wanted to make sure that all of the students who didn't get a chance to play last time (we just ran out of time) were all able to have a remote and try to keep time in their heads. Before we began Chris orally went over what we did last time and had the students answer questions about what operation we were using (subtraction) what the difference was between the negative and positive numbers, and seconds and milliseconds vocabulary. We brought the students up again 4 at a time and had them use the same people that were created last week (all of that same work was already there from the last time we created them all). This time we decided to concentrate on the 2nd of the 4 rounds that the game plays. During the 2nd round each of the 4 players have a different time they are trying to get the closest to so it means 4 different math problems. We put the students name on the board and put the times they were trying to hit and had all of the students write down the same info in their Math copybooks. Then the 4 began playing. At the second round we had this:
Player - Total time - Time recorded
1 16 18:18 2:18 over
2 21 25:81 4:81 over
3 22 30:78 8:78 over
4 20 20:80 :80 over
After the times were posted on the board, Chris asked the questions - Was anybody under time? Was anybody over time? Would that be positive or negative numbers? Who came the closest to the time they were trying to hit? Then the students all had to do the Math problems and tell us how far over they each were from the target time. After we checked a few answers the students were able to finish round 3 and 4 and declare a winner for that group. We switched the group of 4 and began again.
The procedure was the same, but this time the results and the questions we asked were a little different:
Player - Total time - Time recorded
1 16 15.81 .19 under (-)
2 18 18.96 .96 over (+)
3 23 17.15 5.85 under (-)
4 15 17.51 2.51 over(+)
Again, we asked the same questions but added the directions to now put the recorded time in order to closest to target time to furthest away from target time (not making a difference for positive or negative numbers).
Then we asked the students to put the results in order from least to greatest. Now they had to take the negative and positive numbers into account when they placed it in order. This was a bit of a review from the last game we played with them on Big Brain Academy which was popping the balloons in order from least to greatest. Again, we checked a few and moved on to let the students finish the game. We switched out the kids two more times having them take down the numbers for the 2nd round each time and doing the Math. We made only one slight change during the last round which was a bit of a bump in the road. During the last round Chris asked the students to order the numbers not from least to greatest, but from greatest to least. We had 4 different students who said it was harder for them to group them that way then it was to group from least to greatest. After we went around and made sure that we were all together we let the students finish up the round and then have the last groups go. We worked out the Math problems and answered the questions after the 2nd round again. By the time we were finished each of the students had played the game (either this week or last) and they all had at least 15 math problems completed.
A few notes:
1. In an effort to give all the information, today was the first day of our Spring Break. We did have school, but it was only a half day - students out at Noon. So, the group was a little more wound up then usual. Not a surprise for anybody who works with students! All in all they did a good job working the Math problems, but it did take a couple of reminders from Chris that all of the students should be doing the Math work at their desk, not just the people that were playing.
2. We asked the students why they thought it was more difficult to go from greatest to least instead of least to greatest and while we didn't really get a complete answer, a couple of students just said it was easier to start with the negative numbers and move up to the positive ones...
3. One or two of the students made the observation that if you were having a problem with the greatest to least ordering, just do least to greatest and reverse it. This helped some of the confused students, but not all.
In future posts, I will make an effort to see if we can get some screen shots of the games and the math problems that we are completing during the process!
Sunday, March 21, 2010
Wii - Day 5

This week Chris and I continued to work off of last week's negative number work with the Wii. On Friday we worked with another game called 30 Great Games Outdoor Fun for the Wii. And yes, while the reviews are not that favorable it did have some redeeming qualities for the classroom. The benchmark we were covering this week was MA.5.A.2.3 - Describe real-world situations using positive and negative integers. The game that we used was called Internal Clock 2. Basically, each person gets a time
 that they have to count up to. The clock begins counting but after about 5 seconds it goes off and you have to continue to count in your head. When you think you are at the time you push the button. The person closest to the time wins that round. The time is presented in decimal format as seconds, with both tenths and hundredths of seconds. Maybe not the most exciting game around, but the students did like to be able to be faster than the others (and we actually had one student who hit the time dead on). What we did was have them subtract their time from the requested time. The students that hit the button quicker than the requested time were in the NEGATIVE because they were slower than the timer - they still had the amount of time left to get to the correct time. The ones that were over the requested time had to subtract their number from the requested time and they were in the POSITIVE because they were longer than the requested time - they held on too long. For example, during the first round, the student all have to hit the button at 11 seconds. The results were:
- 10.90
- 12.45
- 11.73
- 11.18
- -.10
- 1.45
- .73
- .18
Just a couple of pointers:
- We created the character the day before we played in the room - this game doesn't use the Mii's so they have to be created and named ahead of time. There are only limited options for looks. Also, there is one girl who could be considered a little inappropriately dressed (has a low cut shirt on).
- We found that the students sitting watching the others actually playing started trying to distract the players by yelling out numbers (while the players were trying to count to their number) so we had to nip that in the bud quickly.
- We asked the students for other real world situations where negative numbers could be a factor and we got money issues and (with some help from another adult also in the room) sea level.
Sunday, March 14, 2010
Wii - Day 4

Today our lesson on the Wii was on negative numbers. The specific standard that we were targeting was MA.5.A.2.4 - Compare and order integers, including integers shown on a number line. Chris and I gave a pre-test to the 5th grade students before-hand because it is a concept that they don't have any experience in. The test was simply to put a set of numbers in order from highest to lowest. We had a total of 4 students who were able to get the sequences correct (on a side note, we used Google Forms to create the test). From there, we did an introduction of negative numbers and how they run away from the zero point on a number line. How, even though the number is bigger, it is actually smaller in value. To emphasis this point, we used the Wii game Brain Age - more specifically the game Balloon Burst. The point of the game is to burst the balloons by clicking on them with the controller. You want to click on the balloons in order from smallest to biggest.
 If you choose the hardest level, the numbers will come in both positive and negative forms. As you can see from the picture, the balloons are all different sizes and colors and they even will move around (rotate) on the screen. We gave each student a chance to come around and pop the balloons in order from lowest to highest. While the student was popping at the board, the students at their seats were all writing the numbers down and putting them in order as well. Chris and I went around the room to check their seat work and make sure that they were working on the math. Everything went well.
Later that day we gave the students the same test as a post-test. We went from 4 students get them correct to all students passing and 18 of them that receiving a perfect score. Very exciting results. The other thing that is nice about the lesson is that this concept is not one that we normally get to in the classroom setting (due to other Math issues that we are working on). So, in one class period we were able to not spend a lot of time but cover a topic that doesn't normally get covered in our 5th grade class, all thanks to the Wii!
Tuesday, March 9, 2010
Ch 2 of book

So, chapter 2 of the book really didn't address anything new, it was all about different learning styles. A couple of interesting quotes - only about 20% of students today learn auditorily (through hearing the words and discussing meaning). The other 80% are either visual (people who need a mental model) or picture link
kinesthetically (through movement and touching). So, probably not the best thing to do to stand up and lecture all class long!
Also, only 50-60% of our intelligence is related to genetics. The rest is all environment related. One more for the statistic crowd (like I have a large crowd reading:-)), the brain filters out about 99% of the incoming stimulus which it comes in contact with. Since memory gets rid of most of what it encounters, you only have a short amount of time before deciding whether or not to keep or discard information. For preadolescents it is about 5-10 minutes and for adolescents it is 10 - 20. During the first 20 minutes of class students learn best.
So if you want the classroom where quality learning takes place, you are looking for a classroom "...that is enriched with teaching techniques from all three modalities and in which new information is given in 15-to-20 minute segments for secondary and 7-to-10 minute segments for elementary students, with time for processing in between".
So my question after reading all this - Is this a plus or a negative for block scheduling?
Sunday, February 28, 2010
A geography challenge
You may be familiar with the TV show Amazing Race which is airing on CBS right now (season 16). Basically, the teams (there are 12 of them) race all over the world having to compete against themselves in different contests. It is different from the other reality TV shows in that they are literally in a race which moves from place to place. Well, in the opening sequence they show a number (25 or more) of landmarks which are found all over the world. As a beginning of a geography/computer maps lesson, we showed the opening sequence to the 5th grade class and let them see how many they could find. The winning team did great (better than Chris and I did the first time we watched it!), naming 13 different landmarks. The opening sequence is only 45 seconds and towards the end they just fly by the screen. If you want to compete against the class, see how many you can name!
After you have your list, you can see the Google map that I made. I have put a marker for each of the places that Chris and I found. Using the check boxes in the program (in the top right of the map), you can add layers to the map including pictures and videos (of course they can be added by anybody so I would check it out before showing them in class) of the landmarks and surrounding areas.
From here we are going to use this map to show the distance around the world from the places as well as to hopefully give the students a little more appreciation for cultures and places throughout the world!
Saturday, February 27, 2010
Wii - Day 3

So yesterday (Friday) Chris and I did another round of Wii in the classroom. This time we used the baseball game (in Wii Sports) to review averaging. It is actually the training portion of Wii Sports, not the game itself. The pitcher throws 10 pitches and the computer will add up the total of all the home runs hit at the conclusion. If you don't hit a home run then you don't get any distance added in. But, it is always 10 pitches.
First Chris did a quick review of what averaging was and how to get an average (did this orally). Once she had the concept reviewed we brought each student up to get a swing. If they hit a home run then she marked down the distance on the board and the students each did it on their papers. If they didn't get a home run then we marked nothing. After each hit the student would pause the game so the next student could come on and take a swing. At the end of 10 swings we have a total (the game gives it to you so the students could check their addition on their papers) distance hit and we averaged that by the number of home run hits to get an average. Then the teacher did the math on the board to have students check their average work. We played 4 rounds which was enough to let each student get to bat twice. As before they were interested and excited about getting to play.
Some Notes:
1. The students really like the music. When we put the overhead speakers on you should see them all start bobbing their heads up and down. They can keep the beat and some of them even hum/sing along with the tune (just a music beat).
2. The hardest part for the students was remembering to hit the pause button after each swing! Especially if they hit a home run, they were too busy jumping up and down or giving their neighbor a high-five to remember! :-)
3. We were able to reinforce the idea of a repeating decimal (instead of a remainder) when the average didn't come to a whole number.
4. One student realized that he was able to do the math quickly in his head just by moving the decimal place over 1 spot since we were always dividing by 10.
5. Interesting to see some of the students timing when the ball is pitched. Some are right on, but some have very poor hand-eye coordination. Of course, this would probably improve with more practice with the console.
6. We are still using guest Mii's to play. That means none of the scores or information gets saved. We will have to begin to have the students make their own Mii's to play some of the other games. We are also going to need to make a Class Mii for when we are playing these whole class events (that way 1 student's Mii doesn't get an unfair advantage -either positive or negative -from all the others)!
Subscribe to:
Posts (Atom)


